Assembly Instruction
- Ensure that the end of the tube is cut square within +/- 1 degree and remove the burrs and sharp edges.
- Wipe the ID and the OD of the deburred Tube end properly.
- Insert the nut and sleeve on to the tube as shown below

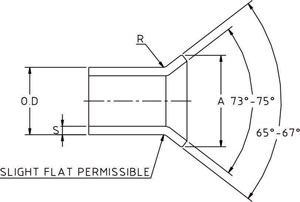
Flare the Tube with a special flaring tool to 37 degree, dimensions of Flared Tube according to SAE J533 standard as shown below

The Dimensions of the flared tube according to SAE J533 are shown below
| Nominal Tube O.D Inch | A Single Flare Diameter | R | S | |||||
| Inch | mm | Inch | mm | Inch | mm | |||
| Max. | Min. | Max. | Min. | ±0.02 | ±0.5 | ±0.02 | ±0.5 | |
| 1/8 | 0.20 | 0.18 | 5.08 | 4.58 | 0.03 | 0.8 | 0.035 | 0.88 |
| 3/16 | 0.28 | 0.26 | 7.11 | 6.61 | 0.03 | 0.8 | 0.035 | 0.88 |
| 1/4 | 0.36 | 0.34 | 9.14 | 8.64 | 0.03 | 0.8 | 0.065 | 1.65 |
| 5/16 | 0.43 | 0.40 | 10.92 | 10.16 | 0.03 | 0.8 | 0.065 | 1.65 |
| 3/8 | 0.49 | 0.46 | 12.44 | 11.69 | 0.04 | 1.0 | 0.065 | 1.65 |
| 1/2 | 0.66 | 0.63 | 16.76 | 16.01 | 0.06 | 1.5 | 0.083 | 2.1 |
| 5/8 | 0.79 | 0.76 | 20.06 | 19.31 | 0.06 | 1.5 | 0.095 | 2.41 |
| 3/4 | 0.95 | 0.92 | 24.13 | 23.37 | 0.08 | 2.0 | 0.109 | 2.76 |
| 7/8 | 1.07 | 1.04 | 27.17 | 26.42 | 0.08 | 2.0 | 0.109 | 2.76 |
| 1 | 1.20 | 1.17 | 30.48 | 29.72 | 0.09 | 2.3 | 0.120 | 3.04 |
Screw the nut on the body until finger tight. Further tighten the nut with a wrench 1/4" turn in order to make a leakproof metal to metal sealing connection.
