


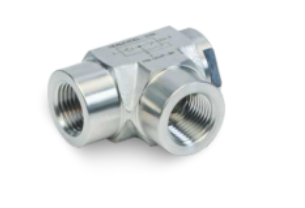
Quick Exhaust Valves (QEVs) are vital components in pneumatic systems, accelerating cylinder retraction and boosting overall system efficiency. However, even these reliable workhorses can encounter problems from time to time. Luckily, most issues can be easily identified and resolved with the right knowledge. Let’s delve into the common troubleshooting challenges associated with the Quick Exhaust Valve and explore effective solutions to get your system back on track.
Understanding QEV Operation:
Before diving into specific problems, let’s refresh our understanding of how Quick Exhaust Valves operate. These valves open rapidly to exhaust air from a cylinder, enabling faster retraction compared to standard exhaust ports. This translates to quicker cycle times, improved system efficiency, and reduced energy consumption.
Common troubleshooting scenarios:
1. Slow Cylinder Retraction:
- Symptom: The cylinder retracts sluggishly, impacting overall system speed.
- Potential Causes:
- Blocked exhaust port: Check for debris or foreign objects obstructing the exhaust path. Clean the port thoroughly.
- Internal valve malfunction: internal wear or damage within the Quick Exhaust Valve could impede airflow. Consider cleaning or replacing the valve.
- Incorrect valve size: Ensure the Quick Exhaust Valve’s flow capacity matches the cylinder’s exhaust requirements. Using an undersized valve can restrict airflow.
- Leakage: Inspect for air leaks around the valve body or connections. Tighten loose fittings and replace worn seals if necessary.

2. Excessive noise:
- Symptom: The Quick Exhaust Valve emits unusual noises during operation.
- Potential Causes:
- Debris in the valve: Similar to slow retraction, debris can cause turbulent airflow and generate noise. Clean the valve thoroughly.
- Worn internal components: Wear and tear on internal parts can lead to rattling or screeching sounds. Consider replacing the valve if cleaning doesn’t resolve the issue.
- Incorrect installation: Improper mounting or misaligned connections can cause vibration and noise. Ensure the Quick Exhaust Valve is installed correctly as per the manufacturer’s instructions.
3. Valve not opening:
- Symptom: The Quick Exhaust Valve fails to open, preventing cylinder retraction.
- Potential Causes:
- No or insufficient control signal: Verify that the electrical or pneumatic signal reaching the valve is correct and strong enough to activate it.
- Internal valve blockage: Similar to slow retraction, internal debris or damage can inhibit valve movement. If required, clean or replace the valve.
- Pilot valve malfunction: Some Quick Exhaust Valves utilize pilot valves for actuation. Check the pilot valve’s functionality and address any issues identified.
4. Air Leakage:
- Symptom: Air leaks from the Quick Exhaust Valve, reducing system pressure and performance.
- Potential Causes:
- Worn or damaged seals: Seals deteriorate over time, causing leaks. Replace worn seals with compatible replacements.
- Loose connections: Check for loose fittings around the valve body and tighten them securely.
- Cracked valve body: Inspect the valve body for any cracks or damage that might compromise its integrity. Replace the valve if necessary.

Interactive troubleshooting tips:
- Consult the manufacturer’s manual: Each Quick Exhaust Valve model has specific troubleshooting guidance. Refer to the manual for detailed instructions and recommended solutions.
- Utilize visual inspection: Look for signs of wear, damage, or debris around the valve and connections.
- Perform a pressure test: Isolate the Quick Exhaust Valve and conduct a pressure test to identify leaks or internal malfunctions.
- Seek professional assistance: If the problem persists or you’re unsure about the cause, consult a qualified technician for expert diagnosis and repair.
Preventive Maintenance:
Regular maintenance is key to preventing quick exhaust valve problems and ensuring optimal system performance. Here are some key practices:
- Schedule regular cleaning and inspections: Clean the valve and its surroundings periodically to remove debris and check for wear or damage.
- Replace worn seals and components: Proactively replace seals and other components before they fail, minimizing downtime and preventing further issues.
- Follow proper installation and operation guidelines: Ensure the Quick Exhaust Valve is installed and operated according to the manufacturer’s specifications to avoid premature wear and tear.
By understanding common troubleshooting scenarios, implementing effective solutions, and adopting preventive maintenance practices, you can keep your Quick Exhaust Valves operating smoothly and efficiently, maximizing your system’s performance and productivity. Remember, early identification and intervention are crucial for preventing minor issues from snowballing into larger problems.
Remember: This blog is for informational purposes only and should not be considered a substitute for professional advice or repair services. Always consult a qualified technician for complex troubleshooting or repairs.


