Installation Instructions
Tube fittings have their own installation instructions that need to be followed precisely in order to get the desired output. The installation instructions will include the essay specification along with recommendation and for which application these tube fittings will work. without following these installation instructions it is highly recommended that you should not proceed with the tube fitting installation. Have a glance!
- Ensure that, the end of the tube is cut square and free from burrs without causing undue chamfering of the tube end.
- Loosen the fitting Nut.
- Insert the tubing into the fitting assembly resting it firmly on the internal shoulder of the fittings.
- Finger tighten the nut.
- (A) Tighten the nut with a wrench 1-1/4 turns from the finger tight position. For the tube fittings size 6mm / 1/4" and above (see fig 1)
- (B) Tighten the nut with a wrench 3/4" turn from the finger tight position for the tube fittings size 4mm / 3/16" and below. (see fig 2)

SEALEXCEL® RECOMMENDATION
For high pressure application
Due to variation in the tubing diameter SEALEXCEL recommends the following instructions for safety and excellent performance of high pressure applications.
- After insertion of tubing to the fittings assembly, tighten the nut approximately 1/8 turn with a wrench from finger type position or until the tubing does not rotate freely by hand.
- Further tighten the nut with a wrench 1 ¼ turns to have a firm and safe grip.
REASSEMBLY INSTRUCTION
SEALEXCEL Tube fittings may be assembled and disassembled repeatedly. The following instructions should be carried out to reassemble the fittings.
- Firmly insert the tubing end with the previously set ferrules into the fitting body and tighten the nut to a hand-tight condition.
- With a wrench, tighten the nut until a sharp condition rise in torque is felt, then simply snug with wrench.
SAE / MS STRAIGHT THREAD AND ISO PARALLEL THREAD POSITIONABLE
Elbows and Tees Installation procedure

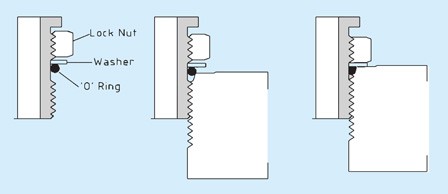
- Lubricate the ‘O’ -ring with lubricant compatible with the system fluid and ‘O”-ring material.
- Turn the fittings into the straight thread port until the metal back-up washer contacts the face of the port.
- Position the fittings by backing it out, (not more than one turn).
- Hold the fittings in position and tighten the lock nut until the washer contacts the face of the port.
- SAE/MS positionable elbows and tees are compatible with SAE J1926 ports.
- ISO parallel thread positionable elbows and tees are compatible with female ports having BS 2779 threads.
Face Seal 'O' Ring Fittings :
Installation ProcedureThe ‘O’- ring requires a smooth, flat seating surface, this surface must be perpendicular to the axis of the threads.
- Turn the ‘O’- ring seal fitting in the port until finger tight.
- The squeezing effect on the ‘O’- ring can be felt during the last 1/4 turn.
SAE SPECIFICATION
Installation ProcedureSEALEXCEL® SAE Straight thread ‘O’-ring fittings are designed and manufactured to meet SAE standard as follows
- Male or External fittings End (Dimension: SAE J514)
- Straight thread SAE J475 (Equivalent to ANSI B1.1 or ISO R725)
- Female or Internal Straight thread (Port : SAE J1926)
FITTINGS AVAILABLE INCLUDES
Connectors, Positionable SAE Elbows and Tees and SAE reducers.Thread and 'O'ring Sizes
| Nominal Tube OD | Port Size | Thread Size | ‘O’ Ring Size No. |
| 1/8 | 125 | 5/16-24 | 902 |
| 1/4 | 250 | 7/16-20 | 904 |
| 3/8 | 375 | 9/16-18 | 906 |
| 1/2 | 500 | 3/4-16 | 908 |
| 5/8 | 625 | 7/8-14 | 910 |
| 3/4 | 750 | 1-1/16- | 912 |
| 1 | 1000 | 1-5/16-12 | 916 |
PORT CONNECTOR INSTALLATION PROCEDURE
- Remove nut and ferrules from the first of two Fine-LokTM / Well-LokTM ports to be connected.
- Slip nut only on port connector over machined ferrule.
- Insert connector into first port and snug up nut by hand. Tighten the nut with wrench 1/4 turn only. For 1/8, 3/16, 3mm and 4mm tube fittings, tighten the nut 1/8 turn from finger tight position, subsequently connec- tions are made snugging the nut by hand.
- Insert other end of port connector into Fine-LokTM/Well-LokTM port 2, and tighten the nut 1¼. For 1/8, 3/16, 3mm and 4mm tube fittings tighten the nut 3/4 turn from finger tight position.
PLUG INSTALLATION PROCEDURE
For 6mm, 1/4 and above size Tube Fittings, tighten the plug with wrench 1/4 turn from finger tight position.For 1/8, 3/16, 3mm and 4mm tube fittings, tighten the plug with wrench 1/8 turn only.
Make subsequent connection by tightening slightly with wrench after snugging the nut by hand.
